Friday, 18 April 2014

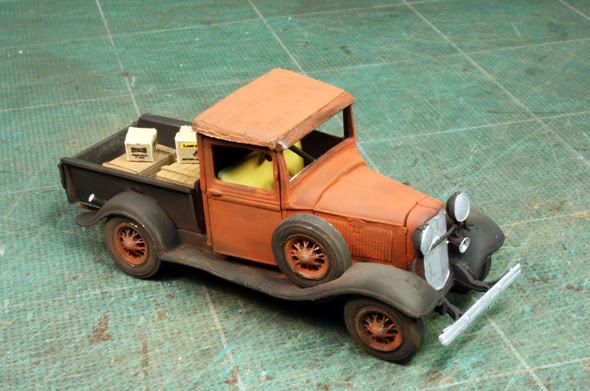
Comparing an Athearn to Berkshire Truck


As I now have two O scale trucks on my layout I noticed a size difference. Peter also mentioned this as they both appear to be the same vintage, 1934 Ford trucks. The Athearn model seems a bit smaller in size. I am not sure why. I would be interested in hearing from anyone that has noted the same difference....George Dutka

Thursday, 17 April 2014

Berkshire Valley Inc. - 1934 Pickup Truck

Building an O Scale Truck
What's in the Box No. 3 gave one a view of what is included with this nice truck kit. I used Walthers Goo to attach most of the parts once filed and cleaned. I did have to do some extensive trimming to the axles so the wheels would fit under the fenders. I painted all the parts Floquil Brunswick Green (which is almost black). The headlights, grill, bumper and gas cap are painted Floquil old silver by brush. I dabbed some signal red on the tail light and stick shift ball. I was going to paint the truck two tone as seen on the box but decided to use Bragdon weathering powder for the coloured areas. I went with Antique Iron brushed on the cab which gave it a nicely weathered look. I also covered the rims with the same powder. The frame, tires and truck bed got a coating of my black soot powder. This project was a nice change from my other winter model projects and surprisingly not at all difficult to build...George Dutka

The old pickup is being put to work...seems an arriving boxcar  load of local freight needs delivery.
The truck is ready to roll other than I still need to find a plate to make things legal.

Monday, 7 April 2014

Portland Locomotive Works - Constructing a Water Tank

The tank is ready to be added to my module.
SR&RL White Birch Water Tank - O Scale
 One may have seen my "What is in the box No. 2" back in December that included all the parts for this kit. The kit did not have any plans included but was a very straight forward build. I used canopy glue for most of the wall construction. I used Walthers Goo to add the fine skin siding to the walls. The corners take a little extra effort to get a nice fit. I used some 1x8" HO scale trim for roof eves as none are included. I modeled the door as open giving me the option of adding details inside the doorway. On the door I used Grandt Line hinges #5095 and a door handle from my HO scale parts box.

The walls are finished. Window, spout and chimney needs to be added along with the roofing.

The walls got a coat of Hunterline Weathering Mix. Once dry a wash of Floquil grime was added and a second wash which was Floquil rail brown in areas that I wanted to highlight. Bragdon powders are used to weather the walls a bit more. The window and door got the same applications.

The roofing included with the kit is very nice. It does have to be glued on strip by strip which was not a problem. Once applied it got a coating of Bragdon powders...mainly soot. A chimney is included which was painted Floquil old silver before adding. The water spout and brackets are painted the same with some weathering added. The glazing for the window got a spray of flat finish before installation. I am really happy with how the water tank turned out and for the price of $31.00 it is an excellent deal...George Dutka

Roofing and chimney is added and weathered.
Rear wall.

Sunday, 6 April 2014

W&Q RY - Peter's Views


Peter Mumby took a few photos of my W&Q module a few weeks ago...thought I would share them with you...George Dutka


Friday, 21 March 2014

Bar Mills - Telephone Poles

Our finished O scale poles which are a Pittsfield Expo handout. Peters pole is to the right.
Text by Peter Mumby, photos by George Dutka

Last Monday George and I got together for our weekly 3-hour work session.  I had brought my camera along and between photography and shooting the breeze, half our time quickly disappeared.  With only 90 minutes remaining, what modelling project could we get in to?  At that point George pulled out a Bar Mills kit for "Two O Scale Telephone Poles & Lampheads."  Not only did we have the perfect small project for the day, but electricity would finally be coming to the remote part of Southern Quebec/Northern New England represented on our On30 modules!

The poles are assembled but still needing the insulators and lights added. Some weathering is also needed. The binder in the background is our inspiration, courtesy of George Sellios.
Since the kit included neither instructions nor photographs, a little research was required before we got out the glue bottle.  What did a simple 1950's line pole look like?  George's file of layout shots eventually yielded a George Sellios scene with just what we were looking for.

We started the project by distressing the poles with several passes of a razor saw.    Next came an application of Hunterline stain - weathering mix for George's pole and brown for my  representation of a newer prototype.  Holes were drilled for the lampheads and then the cross arms were fastened on using Canopy glue.  The poles were then ready for an application of PanPastels.  I used the deep oxide colour while George went with the light and dark greys.  After painting the lampheads with Floquil Pullman green and old silver, they were ready for installation using a bit more Canopy glue.

Since the kit contained no insulators, a bit more thinking was due on our parts.  Now, George has lots of ideas, has a great supply of modelling supplies, and is well enough organised to know where to find things.  Within a couple of minutes he had located a container of Craft Glass Beads (from the Dollar Store) and we were back in business.  The smallest beads were quickly extracted and painted with Floquil CNW gloss green.  Four NBW castings were located for each pole; these castings, along with the beads, were then attached using Canopy glue.  Weathering powders were used to colour the NBW castings and to add a little rust to the lamp shades.  The project was complete, and our time was up.  Now, what are we going to work on next week?

The lamp bulbs got a dab of Old silver while the bolts had rusty  Bragdon powders added.
The poles are finished. Mine was done lighter as an older pole. Peter's is much newer. I think the local delivery truck on Peter's module took out his old pole.

Tuesday, 18 March 2014

Colouring Castings with PanPastels

The stumps, crates, lumber stacks and dogs that we tried finishing using PanPastels. One can see some  finished casting, while others are just primed or in process of being finishing in this photo. The products we tried are also found included.
 PanPastels and O Scale Casting
Peter Mumby and I get together each Monday through the winter to work on modeling projects that are of common interests. We have been playing around lately with PanPastels...Peter will fill you in now...George Dutka

Here we see three stumps. One is primed. The middle stump has had Hunterline stain added and the finished stump coloured with the four PanPastels seen in the photo.
Photos and text by...Peter Mumby
Over the last few weeks we have been weathering freight cars using PanPastels.  We have found that they are quick and easy to use, with minimal mess and no offensive odour.  They are particularly good for an overall dulling of the car's finish; for more subtle effects, dry brushing and weathering powders still have their place.

This time around we decided to try colouring some 1:48 detail castings with the PanPastels as the principal medium.  We had some stumps and wood bundles (both plaster castings from Produits MP), and a group of dogs ( slippery plastic castings of unknown origin picked up at a train show).

All the detail pieces were given an initial spray of grey primer. Once the primer was dry a wash of Hunterline stain is applied. The stumps were coloured first, using the dark grey pastels on the bark areas.  Light grey and raw umber were used on the top (cut) portion of each stump.  The wood bundles were brushed with light grey and raw umber as well.  The banding was highlighted with a black Sharpie marker.  We were quite pleased with the final appearance of all the plaster castings.  The dogs were coloured with either greys or red/ browns, according to their apparent breed.  We weren't entirely pleased with how the dogs turned out; probably the plastic material just didn't hold the pastel colours as well as the plaster.  

Check out the photos and see what you think.  Working with the PanPastels has been fun and instructive - I'm sure we'll find more applications in future projects!

Three of the dogs we applied PanPastels to. We used a marker to add the eyes. George added a coat of Bragdon powders to his dogs at a later date which appeared to colour them better.
One of the finished stumps is planted on Peter Mumby's module.
Here we have a few of the finished stumps and dogs.

Saturday, 8 March 2014

A Covered Water Tank for my W&Q Module

This turned out to be a great kit which is small enough to fit almost anywhere on my module.
 I finally added my new O scale covered water tank to my W&Q module. I will cover the construction of the kit shortly....enjoy...George Dutka

A closeup look at some of the details added around the tank. I modeled the door as open adding a barrel and lining bar, a coal shovel and some weeds and blocks scattered around.
An overall look at the scene. I had to clear out a few trees and build up the area for a base before the tank could be added. The structure is right against the backdrop.