|
| The freight house is ready for a new platform and flooring. |
Building a freight house for Quebec Junction
I scratch built a freight house to fit a spot at the end of my W&Q module. It has tracks to the front and rear, so freight doors are required on both ends. Peter Mumby and I worked together on our structures for both modules. I had available some O scale Mt. Albert scribed siding that would work well for the walls. Peter had a bag of Grandt Line O scale window and door castings to fill the openings. The doorway trim was made using 2 by 8 wood. For the roof I used card stock painted grimy black on the edges and underside. One of the doors I really liked in Peter's bag which I used was a screen door. I modelled all my doors open so the interior details can be clearly seen. I used masking tape for the roofing, trimming it to 3 scale feet wide. It was painted Floquil Brunswick Green (which is actually a black) then weathered with Bragdon soot.
All the wood pieces are stained Hunterline Cordovan Brown. Once dry a wash of Floquil grime was applied, which was really thinned down. Bragdon powder is used to weather up the walls some more. The windows and doors are painted Floquil coach green. The glazing added is plastic airbrushed with flat finish.
 |
| All the door, windows and wall sections are seen before assembly. If you look at the large freight door you can see the brass hinges I was adding. |
 |
| The freight. door is seen with one brass hinge attached. I cut one working hinge in half making a pair. This is from my parts box. |
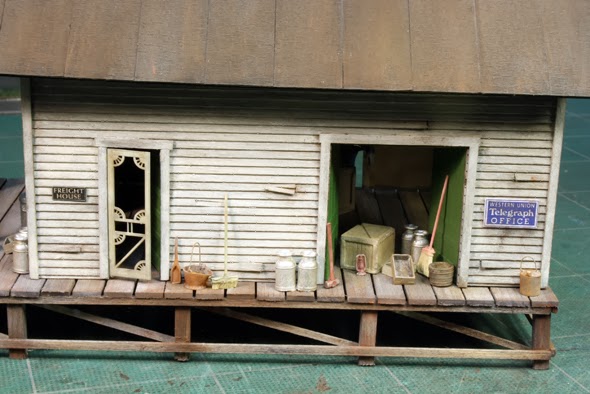
Signs and details...
The Quebec Jct. sign was printed on my computer printer on heavy stock paper. I used Walthers Goo to attach all my signs. The REA sign is made from a photo I took of the sign found on the B&M Ely, Vermont station. The Western Union sign is from my Haydenton Kit. I ordered a chimney from Schomberg Scale Models. I had to cut an angle on it before painting it Floquil grime and adding Bragdon powders to dirty it up. I finally had a place to add many of the details I have collected over the years. The grain sacks, barrels, brooms and large boxes are from Schomberg, the empty crates and push broom is from Evergreen Hill, while all the others details are from Berkshire Valley. I will show you all the details in my next post...George Dutka
 |
| I added a good amount of bracing to the interior although the siding is quite thick. I also gave the inside a coat of Hunterline stain to help seal the wood. |
 |
| The front track side view of the structure is seen awaiting the doors to be added. I weathered up the building really well. I had pulled a few boards up and added rows of nail holes. |
 |
| The end and rear track side walls of the Quebec Jct. freight. house is seen. The windows glaze got a coat of Floquil flat finish adding to the worn character of the building. I modelled all the doors open so I could display all my interior details that I have been saving for such a project. |